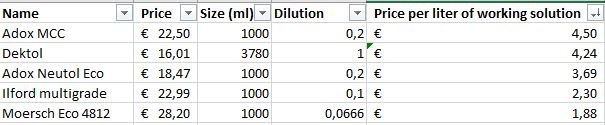
Moersch Finisher Blue review

Since I live up in the arctic, a lot of my photography includes snow and winter landscapes. When making darkroom prints, it bugs me that I can’t seem to get a good cool tone in the prints. Toners like sepia and selenium give the opposite of what I want to achieve, which is a more cyan/blue tone. Gold toner does work well sometimes, but it is just so very expensive nowadays so I am not using it other than for particular larger fiber prints I want to mount and frame.

Since I have a bunch of benzotriazole and I know that restrainers will give cooler tones, I tried it on a bunch of tests and found that 1-4ml/l gave absolutely no visible difference. I didn’t go further than that, but I am sure that at about 10ml/l you will get some cooler tones, based on internet hearsay.

But I knew that Wolfgang Moersch has a product called Finisher Blue which is supposedly an additive that you can use with your regular developer to get a more cold tone developer. Based on the MSDS I could see that it contains, as to be expected, mostly BZT, but also something called 1-phenyltetrazole-5-thiol. Or Phenyltetrazole/Phenylmercaptotetrazole. This is also a restrainer, and I found a mention of it in a patent by Polaroid from the 80s. I contacted Mr Moersch about this additive, if there was any difference with using it or just regular BZT. He said:

Finisher Blue contains a much stronger and more bluish working restrainer Phenylmercaptotetrazole.

So, while it contains just two different restrainers, according to Mr Moersch, this other one is more blue working. Sounds hopeful!

The instructions say to use 5-10ml per liter of developer, and Wolfgang mentioned that after 3ml the paper will need more exposure to get to the same level of density. I can confirm this, already at 4ml I needed to add about half a stop of light more. In these example images I tried to keep the average brightness the same but it was difficult. Here are examples of 0, 4 and 8ml per liter of developer. I used Moersch Eco 4812, which is already a slow acting developer and with this additive it got even slower. I recommend starting with a slightly spicier than usual developer to adjust.

At 8ml it took probably 10min to develop the sheet, which I think introduced some green tones. As you can see below, it almost looks like the 4ml one is cooler than the 8ml.

The difference is slight and subtle, but it is there for sure. Without a good monitor, you might not even see a difference, but in real life you can see the cooler tone.

The shot above is printed on Ilford MG IV RC, and here below you can see how different paper reacts to Finisher Blue. The Foma RC paper I also tried got an even cooler tone and reacted in my opinion better. The cool blacks feel nice and black, with the Ilford paper it feels like something is a bit off. Something got funky with the contrast, and I was struggling to get a good filter/exposure time combination.

Both these tests are extremely non-scientific. Not only is the exposure different in each sheet, the scanning process will introduce variables too. I set black and white points for each channel on each image, and tried to make them look close to the real life paper, but I can’t say I spent a lot of time trying to match anything. I just wanted to get some examples and let you guys know a product like this exists and how it works.

Lastly, what is a restrainer? Well - a restrainer will increase the threshold when a silver crystal that got exposed to some amount of light, gets developed by the developer. So you could say it acts like a high-pass filter on the emulsion. These are often used to prevent fogging. All light sensitive material will get exposed to some degree by microscopic amounts of lights or cosmic rays, but you don’t want them all to get developed, only the ones that you intended to get developed. The chemistry behind this all is complicated, but you can add a restrainer when working with fogged material to reduce the fog. However, I would say it is not worth it when trying to salvage paper. Especially multigrade paper. Even if you get rid of the fogging, there is just something really off with the contrast and the tones. It will always look kinda dull and weak.

If you have any toner/additive hints on how I can achieve cold or blue tones in my prints, please write a comment! I would really like to know how master printers go about achieving them.

Lens Review: Helios 44M 58mm f2

This is a lens that has become legendary by now. There are various versions of it, I won’t go into detail about the variations, but the one I have that I am reviewing here is the 44M version. M for M42 mount. It’s not the oldest version but after this one there came 7 (or 8?) more versions with minor tweaks and changes.

The reason this lens is famous is probably due to its tendency for swirly bokeh, and in general quite different style of bokeh compared to what we are used to. Here are a couple of examples. Look at the pillow on this first image, the bokeh is wild. On the second image you can see how the background has a sort of swirl.

The lens is actually pretty sharp too. Okey, any modern 50mm lens would blow it out of the water, but for my purposes it is plenty sharp at f 5.6-8 in the middle of the frame. The edges are not that great, no matter the aperture. Here is an example.

You can see how the branches get less defined towards the edges but it’s razor sharp in the middle area of the image. This is also a pretty good example of how the lens handles contrast. It is pretty much what you can expect for a 70s era lens, it has some coatings but it clearly loses contrast towards the upper edge of the frame where it’s much brighter. Due to the way the lens is constructed, where the front element is quite deep into the body of the lens, it does not flare very much. It is like you are getting a built in lens hood. So even if you are shooting in the sun you could expect decent results. Example again:

I am actually shooting towards the sun here, it is in the upper left corner (as evident by the shadow coming from my dog). While the snow in the upper side of the frame has lost a lot of contrast, the rest of the image is not bad actually. I was quite surprised how well it handled this situation.

Handling wise, this lens is a heavy beast. Just metal and glass, and feels incredibly well built. Reminds me a bit of K-era Pentax lenses. Focus is a bit stiff but smooth, aperture has clear clicks. Auto/Manual aperture setting, so it works great with Spotmatics.

Price wise, the value/price ratio was much better a few years ago. The prices of these lenses have gone up a lot, but they were manufactured in massive numbers so if you are patient you might find one in a flea market or something like that. Currently they go for about 60-100USD, depending on version and condition. The early ones seem to be more popular than the later ones.

Alright, that’s it for this time. Please take a look in my shop, and support this blog in some way. All revenue goes into paying hosting bills and buying more gear/film/chems to test and write about!

Lens Review: Mir 20mm f3.5 MC

I was looking for this lens for a few years mainly due to me having a Krasnogorsk K3 16mm cine camera that has a M42 mount, and the zoom lens I have for it has some focusing issues. With the 16mm crop factor a 50mm lens looks more like a 150mm. A 20mm would give something close to a 60mm which is close enough to a normal lens that I could use it for my cine projects (which have gone absolutely nowhere the past few years to be honest).

Anyway, I pulled out a Spotmatic SP1000, mounted the lens and shot a roll of HP5 with this to see how it functions and if I want to keep this lens.

Having used a few Soviet era lenses I was surprised by the build quality. Everything feels really well made and smooth. Distinct clicks on the aperture, focus ring moves smoothly, solid build quality.

Focusing with a 20mm lens is a bit tricky, and the SP1000 doesn’t have much “pop” in the focusing screen. I noticed I had quite a few shots with missed focus unless it was at infinity.

What makes this lens really unique though, is how close it can focus.18cm!! 18cm from the lens plane with this lens is like 7cm in front of the glass. With this large of a field of view you can get some really unique compositions and angles that would be impossible with other glass. But it’s quite difficult to find good subjects that suit that kind of photography.

Sharpness when stopped down to f8-f11 is really good in the middle of the image. Sharpness falls off at the edges quite visibly. Look at the lower left edge of this image for example

The multicoating is actually really good, the loss of contrast when having bright lights straight in the lens is not too bad. MUCH better than the 80mm single coated Zeiss lens on my Hasselblad. Look at this image for example, the sun is shining behind the leaf.

The bokeh is quite smooth and I have nothing negative to say about it really. It is not the sharpest lens wide open but it’s not too bad. This was shot at f4.

If you can find this lens for a reasonable price, and you want a very wide angle M42 lens I can recommend it. It’s not an every day carry lens, but it has its place. Pentax has a 20mm f4.5 M42 lens that can be found at around the same price, and the faster K-mount ultra wide lenses are very rare and very expensive. I have the SMC-K 20/4 also on the shelf and eventually I will review it too, but I can tell you right now that it is not that much better. Anyhow, it’s K-mount so a little bit of an apples/oranges comparison..

That’s all this time, let me know if you have any questions. Here’s a couple of sample images.

Kodak Pakon scanner updates

There has been some progress recently when it comes to the Kodak Pakon scanner, of which I have the F135+ model.

First off, Kai Kaufman has done what I previously thought impossible, he has reverse engineered the Pakon windows driver and made a new homebrew version of it that supports modern 64-bit windows. Read the entire story here if you are technically minded. Warning, it is very technical.

Here is the download link to the drivers.

Second, I have released a new version of my Pakon Raw converter (Windows only at this point). It has some important fixes to a few bugs, but it will work nicely together with TLXClientDemo that you will be using if you use the above approach.

Thirdly, I have been working on a new client for Windows altogether, so you don’t have to use TLXClientDemo. It is just called the PakonClient currently, and it cannot scan anything yet. So far I have just done some research into how TLX works and checked that it is in fact possible to write a new client for this. My hope is that it will work kinda like PSI does, but has support for raw files, works nicely on modern Windows and also has a bit more modern design sensibilities instead of that Windows 95 look that PSI currently has. Here is a link to that.

Reducing film fog through temperature and benzotriazole

I have several times read that when you have expired film with some fogging you should use a cold developer. This goes against my gut feeling, which says that the longer you develop fogged material the more fog you will see. This is true for paper, and should be true for film. So shouldn’t the opposite be true? That you want a HOT developer so you can develop for a shorter period of time?

My own experience tells me that if you have slightly expired films, more active developers work better. I have a lot of Neopan 400 that expired about a decade ago and when developing in Fuji SPD which gives development times of just a couple of minutes, there is zero fogging. But when I tested a roll in Spur Acurol-N, the development was for around 20 minutes and there was loads and loads of fog. Semi-stand and stand development also gives loads of fog on expired material.

I decided I had to investigate this for myself to come to the bottom of things, since I have some 30 rolls of various films that are more or less fogged. I have two bricks of Agfapan 400, the precursor to the now famous APX400 film, that has slightly too much fog for getting a decent scan. In the darkroom it doesn’t matter too much, but when scanning it becomes a problem if you have too much base fog.

So what I did was I developed snippets at 16c, 20c, 24c and 28c and then measured the base fog with my non-scientific method, which is to scan the strips together on my flat bed scanner and then use the color picker in Photoshop to see what the color of the film base is. It is rudimentary, but it does work for my purposes. I am hoping to be able to find a densitometer in the future so I can do these tests faster and with more scientific rigor. I also developed a snippet at 20c but added 3ml of benzotriazole 1% to the 300ml of developer.

The results were interesting to say the least. It seems the fogging increases at 16c, as expected. The longer development time will start to fog the film base. Fogging is lower at 20c, but higher at 24 and even higher at 28. So shorter does not always mean better. It seems to me that the amount of fog is a function dependent on both development length and developer activity (ie temperature). Both will increase fogging, but there is a sweet spot somewhere around 20-22c, for Xtol 1+1 at least. It would be interesting to see if this is true for more developers.

The BZT addition works really well, as expected. It is a really powerful anti-fogging agent, but it will also reduce film speed very quickly. What you want to do is to add just enough to reduce SOME fogging, but not more than that. At the level I tested at, my guesstimate is that I lost about a 1/2-1 stop of effective film speed.

After these initial tests, I also wanted to see if it is true that some developers are better than others for expired film. I didn’t have any HC110 at hand unfortunately, which is often hailed as the king of developers for expired film. But Rodinal has also often come up as a good developer due to it not giving full film speed and you can alter dilutions to find a time that works. I also had a little bottle of FX-39 II I am working on to do a full evaluation of. Again, results were surprising. The Rodinal was not at all a good developer, as I had expected. This is an ancient developer, while good for a lot of things, in my experience it both increases fog and also reduces effective film speed. However, FX-39 was really good. The difference was not huge compared with XTOL 1+1, but a difference nevertheless. It was close to the completely clear strip that was developed together with BZT. This may be due to underdevelopment though.

Keep in mind, I developed just one snippet of film, once. It is possible variations occurred due to inconsistent agitation, temperature fluctuations, cosmic rays, whatever. At these very small amounts of developer you also have an increased risk of miscalculating the dilutions. I hope to do some more research on this in the future. Please share if you have some results of your own, write in the comments.

Anyhow, here are the results in a chart. Don’t pay too much attention to the numbers, they only mean something to me in this particular test. But 0 is no fog, and my personal limits are something like 0.5 for darkroom printing and 0.3 for scanning. As you can see, developer choice and temperature choice can lead to either unusable negatives or perfect negatives.

Key takeaways

  • XTOL 1+1 is a pretty good developer for expired film

  • 20c seems to be a good sweet spot

  • Film starts to get fogged after around 10min due to time in developer

  • Film starts to get fogged at around 24c due to increased activity of developer

  • Rodinal is not a good developer for expired film

  • FX-39 is a very good developer for expired film

Things to investigate another time

  • Does different Rodinal diltutions affect fogging?

  • Is prewashing expired film good or bad?

  • Is HC-110 really that good in comparison with other modern developers?

This subject has taken a lot of my time recently, but it has been interesting. Please buy my zines, available in the shop here on the site! That’s it for this time, write in the comments if you like more of this kind of technical content.

Kodak Gold 120 review

I’m a little late to the party but here is my short review of the semi-famous Kodak Gold emulsion that was recently introduced. I got a propack of the stuff before a trip to Greece, where I shot it with a Mamiya 6.

I noticed when loading the film that it has the new Kodak backing paper. It feels very glossy and plasticky. But it doesn’t really matter, as long as I don’t get numbers stuck on my images again (there was a big problem with 120 backing papers recently).

When developing the film I noticed also that this is coated on ESTAR. That was a bit surprising. I haven’t used a 120 film with the polyester base before. Usually it’s just repackaged aerial films that have the polyester base and all professional camera films use triacetate. The downside of ESTAR is that it’s thinner, and much more flimsy. It is also very very strong, it will not snap or tear. Sometimes that is a problem, if you have an issue with your camera you might rather the film snaps than cogs get stripped. The flimsiness also makes it more difficult to load into a Paterson reel. But the films dried flat, can’t complain really.

I set the camera to ISO160 to give it a little extra punch and then just metered normally, average metering. It is clear that this film works great for sunny days. It has that Portra yellowish tone, everything leaning towards the warmer side. I’m not super impressed with the latitude nor the grain. But in medium format the grain is already so small so it doesn’t really matter. And latitude is still way better than slide film.

Overall it is a great “walking around” film. It is not especially good at anything but it is also not very bad at anything either. Skin tones look decent, greens are not very vibrant but decent. Red tones are a little bit mellow, blues go easily into the “pastel blue” area but that’s fine too because you get nice skies.

After the price hikes of the past few years, Portra is now so expensive that I don’t really want to waste it on random vacation pictures. Not that Gold 200 is cheap but it’s at a price point where I can justify taking some pictures just for fun without thinking about it too much.

Here are some images from Thessaloniki, Greece.

Alright, that’s it for this time. Let me know what you think. Please take a look in the shop and maybe purchase my zines to support this blog.

Pentax MZ-10/ZX-10 - The worst Pentax SLR

I wonder why the MZ-10 was also called ZX-10 in some markets. So dumb.

Anyhow, here is a quick review of a camera that I despise. It is the worst camera. It has no redeeming qualities or upsides. For the same amount of money you can get a much better camera in every way. I happened upon this in mint condition in a local fleamarket for something like €10 so I picked it up just because it said Pentax.

But this does not feel like a Pentax camera. It was introduced in 1996, and during that time all camera manufacturers were looking into reducing costs as much as possible. They moved their factories to cheaper countries, like Philippines where this one is made. They stopped using metal parts and instead had plastic cogs and parts made, and the different models were basically just the same camera. There’s a whole range of MZ-* cameras but all except MZ-S are pretty much the same plastic garbage. Even the lens mount is plastic on this model!

The kit lens that came with it is also garbage. I have never held a lighter lens, it feels like a toy. Is there any glass inside this I wonder? Compared to the previous generation, SMC-F, the SMC-FA lenses just feel so cheap even though the F-series also had a bunch of plastic.

I managed to shoot one roll before the camera started acting up. It seems all of these die from the same fault, a plastic cog is worn out. It is difficult to source and difficult to replace. And why bother, it is a shit camera to begin with.

The viewfinder is tiny, 0.77x, 92%. Pentamirror. The autofocus is noisy and the winder sounds like I’m running with almost empty batteries even when they are fresh. It has some functions with different modes but they are confusing and redundant. It takes 2x of the very expensive CR2 batteries, but I also have the battery pack. It is a useless piece of plastic again. Instead of using the expensive CR2 batteries you can instead go with 4xAA batteries that last a while longer. But the battery pack cannot be used as a vertical grip and if you drop the camera you can be sure to destroy the battery pack into a million pieces.

I wish there was something positive I could say about this camera, but there is nothing. This image of the insides should tell you everything you need to know. It’s from a fancier model though, that has a metal lens mount.

Avoid it if you can. But here are some more images.

Rolleiflex 3.5 MX/K4A/3.5A review

For a long while I had a thought that I would like to try out a TLR. At first I was thinking about a MPP Microflex, a Rolleiflex copy. But they are quite rare here in the Nordics, and it seems they are not that very well made either.

I then came upon a Rolleiflex that had some minor issues. The leatherette was gone, the shutter was in need of a service, the mirror had a chip, etc. But I got it cheaply. It has a CZJ Tessar with T coating which is, from what I understand, quite rare for this model.

I started with ordering a new leatherette from Aki in japan, and a new mirror from the states, and while I was waiting for the items to arrive I sent the camera in for service to Analoga Kameror here in Sweden.

Got it back, everything up and running, except for the knob on the film advance lever. I 3d printed one myself, since a new lever would have cost as much as the entire camera did.

I had to read the manual to understand how it worked in full, and I have to say, it’s a darn clever camera. It has a lot of small details that make you go “hah! that’s neat”. Like the sports finder that you can get by flipping down a part of the top hatch. Or the magnifier that’s hidden inside the same hatch. You got stuff like not having to align any arrows when loading film, you just turn the lever until it stops and you’re ready to go. (It detects the change of thickness when it’s not just backing paper but backing paper PLUS film)

The original ground glass is dim and difficult to focus with. I don’t think I have managed to nail the focus EVER when shooting wide open. I wouldn’t recommend this camera for anything where you really want to nail the focus, like studio work or anything where a shallow depth of field is desired. Where it does shine is as a walking around camera, or street photography stuff. Turn the aperture down to f16 and you will get crisp and sharp images. Having a waist level viewfinder is really nice too for that kind of stuff.

The ergonomics of the camera is a bit funky, it takes some getting used to. I had a lot of issues with camera shake at lower shutter speeds. Normally I can do 1/60 just fine on a medium format camera with an 80mm lens. But on the Rollei.. it’s just blurry every time. I think there’s something with the placement of the shutter button that makes me tilt the camera at the same moment as I press the shutter. Getting used to the dials for shutter speed and aperture is a bit strange at first, but after a while I really liked it. Since the camera is down by your waist anyway, it’s easy to see what settings you have by just looking down. As long as it is during the daytime.

There is something strange that happens with every camera that I use. It feels like every camera makes me shoot in a different way. The Lomo LC-A makes me try out things, spontaneous, a bit wild and crazy. The Hasselblad makes me slow down, shoot sparingly. I noticed that I went through a roll of film quite quickly with the Rolleiflex. It was such a nice feeling taking a shot, advancing the film, looking through the viewfinder. So I took a lot of pictures. I had it with me on walks with the dog and took just random pictures of the dog, of the ice and snow. Of a nice rock. And suddenly the roll was finished. Sometimes this is a good thing, there is no point in slowing down all the time, just for the sake of slowing down. Photography should be fun, and that is something that this camera does achieve.

That is it for this time. Please take a look at the store to see if there is something there you like, and support this blog!

Third issue of the zine

I finally got the third issue of the zine made. It was a struggle to finish it, due to the pandemic and everything that has been going on. No travels means no interesting pictures, at least for me.

Anyhow, this issue deals with the concept of a “home” and I think it is probably my finest work to date.

I don’t have very much in stock since I don’t want to have a bunch of zines laying around the house, so order while you can!

https://toivonenphoto.com/shop/agbr-3-home

Pentax Z-20 aka PZ-20

My first real camera was a Pentax SFX. I never liked it very much, the auto-focus was really noisy, it was heavy and changing settings was really slow. After that I never really went into the auto-focus era of Pentax cameras. I much preferred the LX and MX. And for M42 I really like the old Spotmatic SPII:s.

But sometimes I did miss a motor driven camera with auto-focus. After we got a dog, I realized it is almost impossible to get good shots with slow manual focus cameras. And I found a good deal locally for a Z-20 and a broken MX for ~40€.

I’ve shot three rolls with it now, and I realize it’s funny how different cameras affect my shooting style. The faster it is to take a shot, the more shots I take. I burn through a roll much quicker than I normally would. The autofocus helps with taking pictures of moving targets. If the situation is such that the opportunity might go away quickly, I really appreciate having auto-focus (and a popup flash).

At the same time, I remember my disdain for this era of cameras. It is 100% plastic. It FEELS like plastic. The viewfinder is tiny, (0.8x, 92%) and quite dim (pentamirror). The autofocus is still noisy, (Z is one generation after SF). The shutter speeds are not even better than earlier models, 30s to 1/2000s. Sync speed of 1/100. It’s not a very good looking camera either.

A lot of negatives, very few positives. Will this camera be one that I keep on using? I don’t think so. But is it a decent camera? Yes. For a beginner, this is a great camera even. The buttons are well placed, changing settings is easy enough. Aperture priority mode is great on later lenses. And it is a K-mount camera which means there’s loads of great lenses for it.

It’s been a while since I last wrote a camera review, it was quite fun to try out something different and new for a change. Anyhow, that’s all this time. Until next time!

D96 shelf life

Just a quick blog post about this topic since I was not able to find any good information myself before the D96 project began.

In my experience, when you open a bottle of D96 and develop your first roll in it, you have about 6 months of shelf life given that you try to keep the oxygen in the bottle to a minimum. I use Protectan spray which has worked well for me over the years when trying to extend shelf lives of various chemicals.

The developer will not change color, it was clear when I got the bottle (Bellini brand) and it was clear 1 year after. But after a year it was so dead you could not develop anything. I think the shelf life is worse than other developers (eg D76/Xtol) due to it being used as a stock solution. You will mix in a lot of oxygen into the developer when developing and then you pour it back. I get a over a year of shelf life with my XTOL in Protectan, but maybe part of it is due to me being careful when I mix it and when I pour some out.

D96 is a fine developer for cine stock, I think the negatives you get with Double-X in D96 are just perfect and have a wonderful tonal range. But given the cost of getting D96 pre-mixed, and it is less than stellar shelf life, I will not be buying it again. Next time I do D96 I will mix it myself. The recipe is quite easy and the components are not difficult to get hold of.

Anyways, please leave a comment if you have first hand experience with D96 and its shelf life!

Book Review: Shooting Film

While I did not let it influence what I wrote below, for the sake of transparency: this book was provided to me for free as a review copy. No strings were attached when it came to writing a review or what I should write. I have not heard from the publisher after they suggested to send a copy to me.

Film photography has made a huge comeback the past couple of years. If you missed that, you are not really up-to-date on latest trends. But it is a weird situation, the young people who are getting into shooting film, have never done so previously. They have no memories of having used film cameras before, or the process itself. They often know very little of how it all works in technical terms. I have read several stories about youngsters who shoot their first rolls of film, open up the film back expecting the pictures to be on the roll already. Developing? What does that mean?

Since we are in this unique situation where the people starting with film have zero previous knowledge of the medium and they are doing it together with other people who have zero previous knowledge, there is a sort of information vacuum that wants to be filled. Some of these kids are taking it seriously enough that they want to learn more about the nuts and bolts, get better at the craft, or maybe they are aiming at becoming a professional photographer at some point. But where to learn more if you want hard facts not subjective opinions?

I think this book was written with this situation in mind. It explains film cameras, film, developing and how it all works in very simple layman’s terms, but also clearly geared towards people in their late teens or early 20s that are into film photography due to its popularity and hipster-trend. Not necessarily a bad thing, it’s just that I am turning 40 in a couple of years and I have been shooting film since 2003-2004. So the target audience this book was written for, is someone else than me personally.

The book is by and large well written, factually mostly correct and includes a professional photographer with her thoughts on different subject matters. At several points in the book though, it feels like it is written by people who are somewhat lacking in experience. Stuff like, “this camera is good because it was the first camera I bought 4 years ago” makes me raise an eyebrow. Either it should be all subjective or all objective. When you mix your own nostalgic memories with facts, it makes me unsure how to interpret what I am reading.

It is also clear that the book was written under a longer period of time and there was no real editorial review/fact checking before it was sent to the printing press. For example, Provia 400X is talked about like it was still available in stores, and Pro 400H is in the list of current color negative films. And then we have stuff like that the author seems to think that the classic Holga is a TLR (there is even an image included of a TLR Holga). That slide film has a dynamic range of 1.5 stops (the author means exposure latitude), that you should get a Canonet 28 instead of the G3 QL17 because it doesn’t use an “outlawed battery” (it uses the exact same PX625..) 120mm film is mentioned a couple of times. I could go on, but you get the point.

Maybe I’m being unnecessarily harsh, it’s not stuff that the beginner reader will ever notice, think about or face any issues from.

The quality of the book is decent. It is printed in China and the image quality is mediocre but not bad. It is a nice hard-cover book with glossy pages of decent weight.

In conclusion, it is an alright book. If you have recently started shooting film, this is as good as book as any to get started learning more about the medium. It is not expensive, so you might as well pick it up and learn something new. For the more experienced photographer, I don’t think you will find anything worthwhile in this one.

If you decide to order it, please use these Amazon links!

World
Sweden

Kindly check the store if you find something you like, and support my little blog.. But that’s it for this time. I hope to write some more book reviews in the near future. I have loads in my bookshelves.